Rakesha IT Customer Support Specialist
Return to Home Button Return to Home Return to Home Button Return to Home
Active Directory in IT Helpdesk Support

Active Directory in IT Helpdesk Support

Active Directory (AD) is a critical component in IT helpdesk support, particularly within organizations using Microsoft environments. It is a directory service developed by Microsoft for Windows domain networks. Here are the key points relating to its role in IT helpdesk support:

  • User and Group Management: AD allows helpdesk staff to create, manage, and delete user accounts and groups. This includes resetting passwords, unlocking accounts, and assigning users to appropriate groups to control access to resources.
  • Access Control: AD is used to set permissions and access controls for users. Helpdesk staff can ensure that users have the appropriate access to files, applications, and systems based on their roles within the organization.
  • Policy Enforcement: Group Policy Objects (GPOs) in AD allow helpdesk personnel to enforce security policies and configurations across all computers and users in the network. This includes setting password policies, software installation rules, and other security settings.
  • Resource Management: AD helps manage network resources such as computers, printers, and shared folders. Helpdesk staff can assign and manage these resources efficiently, ensuring users have the tools they need.
  • Authentication and Authorization: AD is responsible for authenticating and authorizing users and computers in a Windows domain. Helpdesk support often involves troubleshooting authentication issues, ensuring users can log in and access necessary resources.
  • Auditing and Compliance: AD provides logging and auditing capabilities that helpdesk staff use to track changes and access to ensure compliance with organizational policies and regulatory requirements.
  • Integration with Other Services: AD integrates with other Microsoft services (like Exchange for email, SharePoint for collaboration, and Azure AD for cloud services) and third-party applications, centralizing user management and improving efficiency.

In summary, Active Directory is an essential tool for IT helpdesk support, enabling efficient and secure management of users, resources, and policies within an organization's IT infrastructure.


Assisted Lab: Support Active Directory Domain Networking

This activity is designed to test your understanding of and ability to apply content examples in the following CompTIA A+ Core 2 objectives:

  • 1.2 Given a scenario, use the appropriate Microsoft command-line tool.
  • 1.6 Given a scenario, configure Microsoft Windows networking features on a client/desktop.
  • 2.1 Summarize various security measures and their purposes.
  • 2.5 Given a scenario, manage and configure basic security settings in the Microsoft Windows OS.

- How to join the workstation to the domain and sign in as the domain user.

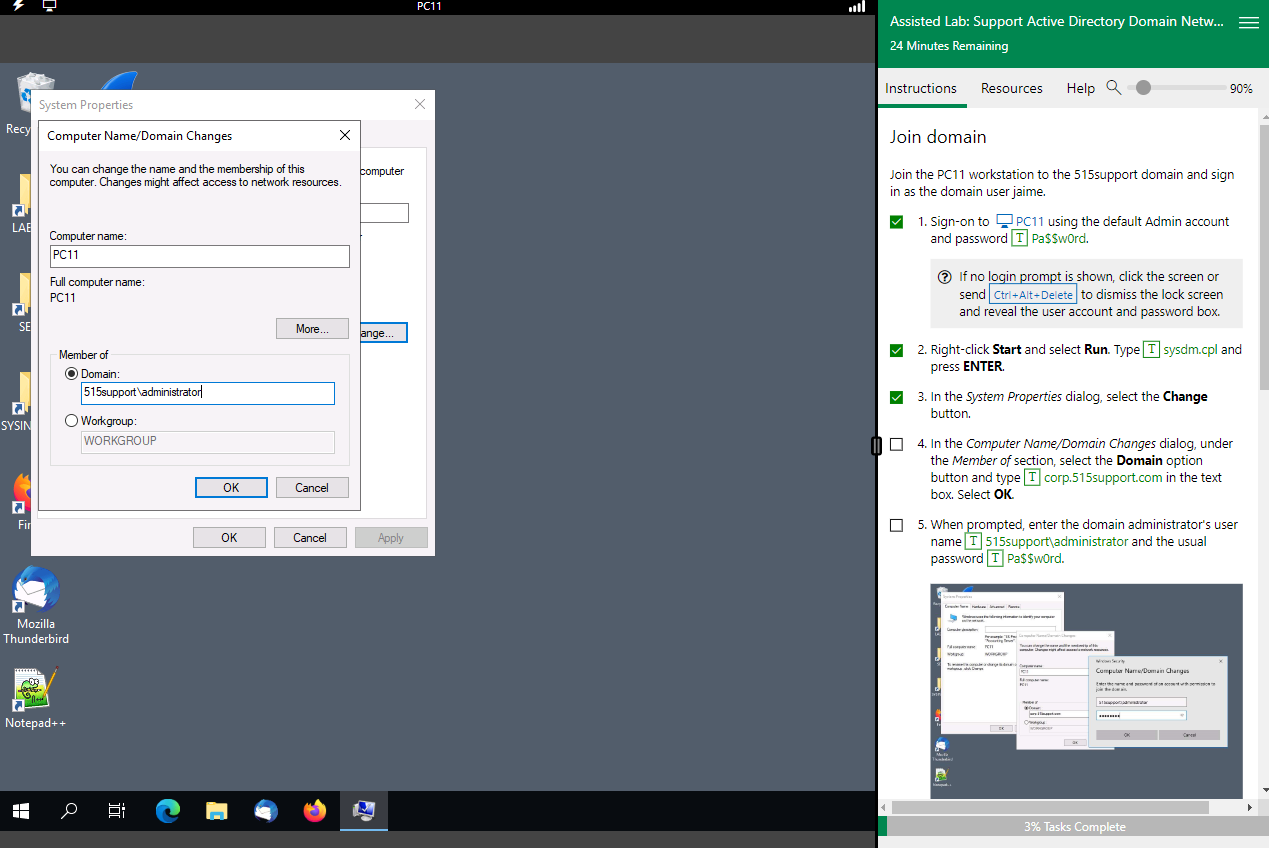
Steps to Join a Workstation to the Domain

  1. Open the System Properties window by using right-click Start and select Run. Type "sysdm.cpl" and press ENTER.
  2. Click on "Change settings" under the "Computer name, domain, and workgroup settings" section.
  3. In the System Properties window, click on the "Change" button to join the domain.
  4. Enter the domain name and click "OK". Provide the domain administrator credentials when prompted.
    Domain Name Screenshot
  5. Restart the computer to apply the changes.

Steps to Sign in as the Domain User

  1. On the sign-in screen, click on "Other user".
  2. Enter the domain user credentials in the format "DOMAIN\username" and provide the password.
    Domain User Credentials Screenshot
Setup Active Directory Lab Environment with Oracle VirtualBox

Setup Active Directory Lab Environment with Oracle VirtualBox

Prerequisites

  • Download and Install Oracle VirtualBox: Ensure you have Oracle VirtualBox installed on your computer. You can download it from the Oracle VirtualBox website.
  • Download an ISO of Windows Server: You will need an ISO file of Windows Server (2012, 2016, 2019, or 2022). You can download a trial version from the Microsoft Evaluation Center.

Steps to Set Up an Active Directory Lab

Step 1: Create a New Virtual Machine

  1. Open Oracle VirtualBox and click on New.
  2. Enter a name for your VM (e.g., "AD-Server"), select the type as "Microsoft Windows" and version as "Windows Server (64-bit)".
  3. Allocate memory (RAM) to the VM. A minimum of 2GB is recommended.
  4. Create a virtual hard disk. The default VDI format is fine. Allocate at least 40GB of storage.

Step 2: Configure the Virtual Machine

  1. Select the VM and click on "Settings".
  2. System: Ensure that the "Motherboard" tab has the "Enable EFI" checkbox unchecked.
  3. Storage:
    • Click on the empty optical drive.
    • Click the disc icon and choose "Choose a disk file".
    • Select the Windows Server ISO you downloaded.
  4. Network: Ensure that the network adapter is set to "NAT" to allow the VM to access the internet for updates.

Step 3: Install Windows Server

  1. Start the VM.
  2. The Windows Server installation should begin. Follow the prompts to install the OS.
  3. Choose the appropriate version (Standard or Datacenter) and select the "Desktop Experience" if you want a GUI.
  4. Complete the installation process, creating an administrator password when prompted.

Step 4: Configure the Network

  1. Once Windows Server is installed, log in with the administrator account.
  2. Configure the network adapter:
    • Set a static IP address.
    • Configure the subnet mask, default gateway, and preferred DNS server.
  3. Ensure the server can connect to the internet and other VMs if needed.

Step 5: Install Active Directory Domain Services (AD DS)

  1. Open Server Manager.
  2. Click on Manage > Add Roles and Features.
  3. Follow the wizard:
    • Select Role-based or feature-based installation.
    • Select your server from the server pool.
    • Check the Active Directory Domain Services box.
    • Include any required features and proceed with the installation.
  4. After installation, click on the notification flag in Server Manager and select Promote this server to a domain controller.

Step 6: Configure Active Directory

  1. In the Deployment Configuration window, select Add a new forest.
  2. Enter a root domain name (e.g., "contoso.com").
  3. Set the Forest and Domain functional levels (choose the latest available for new features).
  4. Set a Directory Services Restore Mode (DSRM) password.
  5. Complete the installation and the server will restart.

Step 7: Verify Active Directory Installation

  1. Log back in after the server restarts.
  2. Open Server Manager and click on Tools > Active Directory Users and Computers.
  3. Verify that your domain (e.g., "contoso.com") appears and that you can create and manage users, groups, and computers.

Step 8: (Optional) Create Additional VMs and Join Them to the Domain

  1. Create additional VMs with Windows client OS (e.g., Windows 10).
  2. Configure the network settings similarly.
  3. Join these machines to the domain:
    • Open System Properties on the client VM.
    • Click on Change settings > Change.
    • Enter the domain name and provide credentials for a domain admin account.
Lab Example

Lab Example

Example Screenshots

```